
Table of Content
Modbus Poll
RZ/N FSP Smart Configurator
J-Link
EtherKit BSP
EtherKit as Modbus Slave, read using Modbus Poll Software
EtherKit as Modbus Master, reading from MOXA
EtherKit as Modbus Master, reading from WAGO
MSH_CMD_EXPORT
modbus_master.c to read from MOXA (FC04): 192.168.101.100
modbus_master.c to read from WAGO (FC03): 192.168.137.x
Project Building stuck at "linking..."
Damaged EtherKit
Overview
1st part: to follow EtherKit Modbus-TCP/IP Example from GitHub.
Using Modbus Poll (Master) to read from EtherKit (slave).
2nd part: to use EtherKit as Master, and read from slave.
MOXA (FC04)
WAGO (FC03)
Prerequisites
Hardware
Before you begin, please ensure you have the following hardware:
- Renesas EtherKit
- ARM Emulator
- J-Tag Connect Card
- 2x10 Ribbon Cable
- USB Type B cable
- USB Type C cable
- Ethernet Cable
- AC/DC Adapter
Software Installation
1.Modbus Poll
You can click link below to download Modbus Poll software:

2.RZ/N FSP Smart Configurator
Renesas RZ/N Flexible Software Package (FSP) v2.2.0 with RZ/N Smart Configurator:

3.J-Link
J-Link Software:
SEGGER - The Embedded Experts - Downloads - J-Link / J-Trace

4.EtherKit BSP
Renesas EtherKit Board Support Package at SDK Manager of RT-Thread Studios:

Procedures
EtherKit as Modbus Slave, read using Modbus Poll Software.
- Create a New Project at RT-Thread Studios, choose Example etherkit_modbus_tcpip

- Configure EtherKit FSP
2.1. Update location of FSP Configurator

- 2.2. Select sc_v2025-01_fsp_v2.2.0

- Follow the FSP Configuration Instructions and RT-Thread Settings Configuration steps at https://github.com/RT-Thread-Studio/sdk-bsp-rzn2l-etherkit/tree/master/projects/etherkit_modbus_tcpip
- Go to Debug Configuration. This is to “update” to using new version of J-Link (older versions may not support EtherKit. Need to copy the whole J-Link folder [C: > Program Files > SEGGER > Jlink_V586] into C:/RT-ThreadStudio/repo/Extract/Debugger_Support_Packages/SEGGER/J-Link. Then change the Actual executable. If successful, the Executable path will look like in the image below. ${debugger_install_path}/$$(jlink_debugger_relative_path)

- Note: If you don’t do this step and is using older versions of J-Link and it does not support EtherKit, you might encounter this issue when you try to flash download the program:

- Connect the EtherKit to your PC as follows:

- 1. USB Type-B cable (PC to ARM Emulator)
- 2.JTAG Connect Card (from ARM Emulator)
- 2x10 ribbon cable (from JTAG Connect Card to JTAG of EtherKit)
- 3. Power the EtherKit (9 to 24V DC).
- PC – [USB TypeB] – ARM Emulator – [JTAG Connect Card] – [20-pin Ribbon Cable] – EtherKit <- POWER
- Build the project and flash download

- You can verify that the Etherkit’s able to be programmed by changing the LED blinking delay time.

- Now plug in ethernet cable to ETH0 of EtherKit, into your PC.
- Also, plug in USB type-C to USB-TTL of EtherKit, into your PC.
- I set the Ethernet port’s IP to 192.168.137.10


- On the RT-Thread Studios, open a terminal, press reset on the Ethernet and type ifconfig.

- Now, I am assigning an IP address (192.168.137.11) to the EtherKit, in the same subnet as my Ethernet Port with IP 192.168.137.10, and 255.255.255.0 is the net mask.

- Follow the steps on using modbus_tcp_test and Modbus Poll Software at
- https://github.com/RT-Thread-Studio/sdk-bsp-rzn2l-etherkit/tree/master/projects/etherkit_modbus_tcpip
- End result:

EtherKit as Modbus Master, reading from MOXA
- 2
- Now we are using the coding from the EtherKit as modbus TCP slave example.
- (Because it has already the coding to for network initialization [ifconfig, setting IP for the EtherKit])
- But we are adding a modbus_master.c file (coding for EtherKit as master).
- I add it under board > ports > modbus > tcp_modbus.
- Coding can be found at Coding section.
- Copy the code from read from MOXA FC04.
- Note that we are using Function Code 04, to read input registers of MOXA.

- Then build, and flash.
- The EtherKit is plugged into a switch, which assigns an IP of 192.168.101.39.
- Also, try to ping the MOXA at 192.168.101.100.

- Now run modbus_master_start

EtherKit as Modbus Master, reading from WAGO
- Now for reading from WAGO is a little different, that is because the IP given to the EtherKit is not of the same subnet as WAGO at 192.168.137.x. Therefore, there will be one additional step that is to set the IP manually for the EtherKit.
- Copy the code from read from wago27 FC03.
- Note that we are using function code 03, to read holding registers from WAGO.
- Build and flash.
- The EtherKit is also plugged into the switch, which gives the EtherKit IP address of 192.168.101.39. So now we need to set the IP of the EtherKit to be at the same subnet as WAGO.
- Also, verify that we are able to ping the WAGO we are reading, eg. 192.168.137.27

- Before this, have to make sure that the WAGO has been set to be a modbus slave.

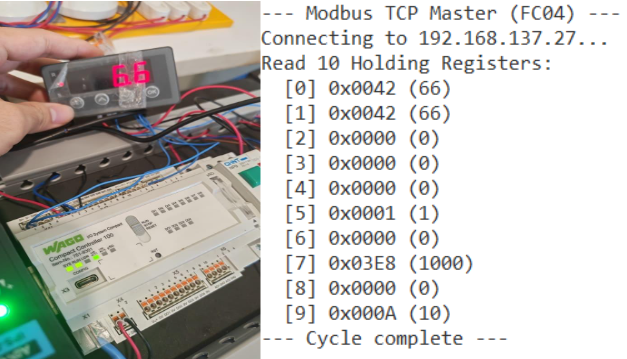
- Run modbus_master_start.
- It reads 27 because I set the value to 27.
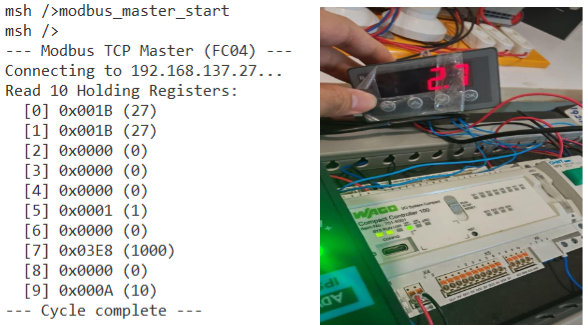
- Verify by changing the values.
Others
MSH_CMD_EXPORT
To not have to run the command and automatically run the function, just place the function at hal_entry.c
Coding
modbus_master.c to read from MOXA (FC04): 192.168.101.100
modbus_master.c to read from WAGO (FC03): 192.168.137.x
Reference
- EtherKit 环境搭建文档
- sdk-bsp-rzn2l-etherkit/projects/etherkit_modbus_tcpip at master · RT-Thread-Studio/sdk-bsp-rzn2l-etherkit
Known Issues
- Project Building stuck at "linking..."


- The linker is blocked by anti-virus software.
- Have to ”trust” the linker.
- Damaged EtherKit

Only powered by USB, or power supply.